PFNA2 Nail Specification, uses, Sizes, Surgical Techniques and Clinical Evaluation.

PFNA2 Nail

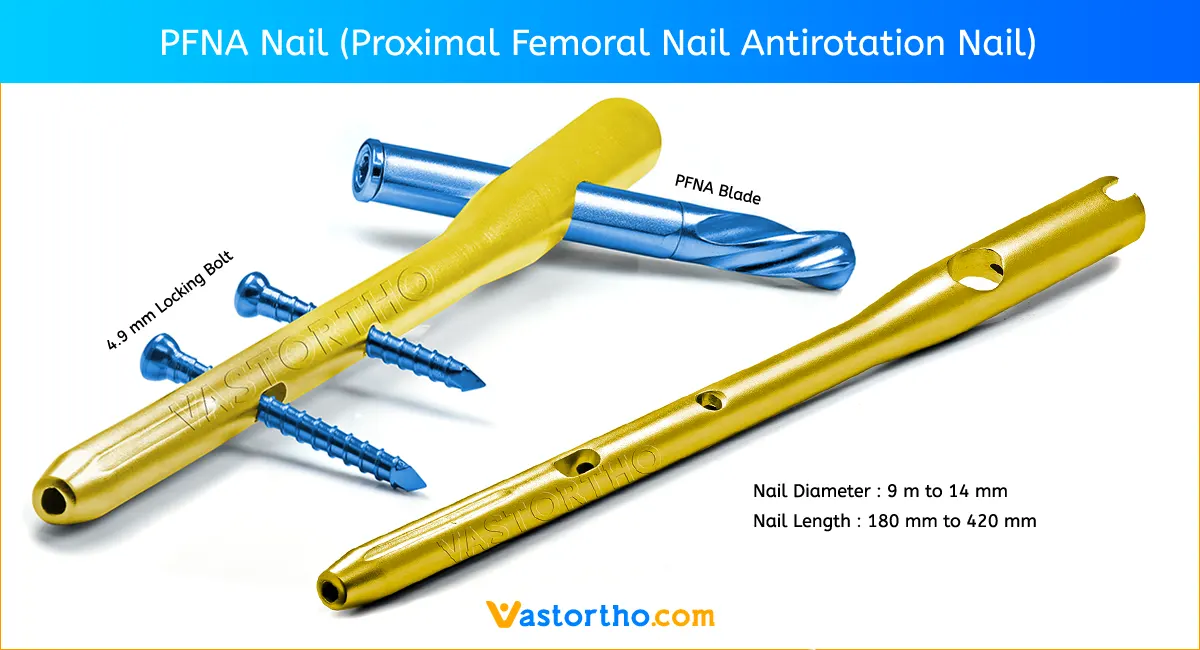
PFNA2 (Proximal femoral nail antirotation for Asia) has been developed especially for Asian patients.

The treatment of proximal femoral fractures in geriatric osteoporotic patients continues to be a challenge in orthopedic trauma. Various kinds of cephalomedullary nails, such as gamma nail, InterTan and PFNA were used clinically. The latest generation PFNA2, specially designed for Asian population, is commonly used for geriatric per-/intertrochanteric fractures. Some clinical studies have previously reported that the short-term clinical outcomes of PFNA2 are satisfactory in most patients, and it provides an anatomy matched with the narrower and shorter femurs of Asians and contributes to decreased complications.

PFNA2 Nail Specification.

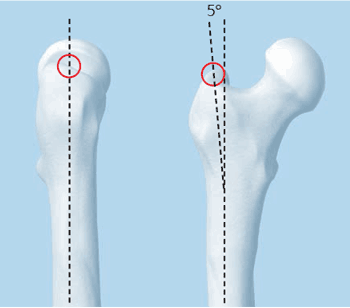
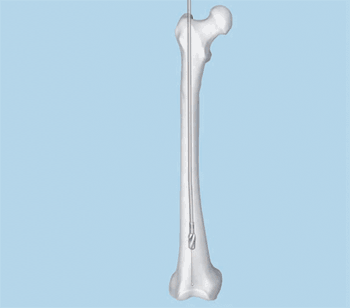
The PFNA2 Nail has a medial-lateral angle of 5°. This allows insertion at the tip of the greater trochanter.

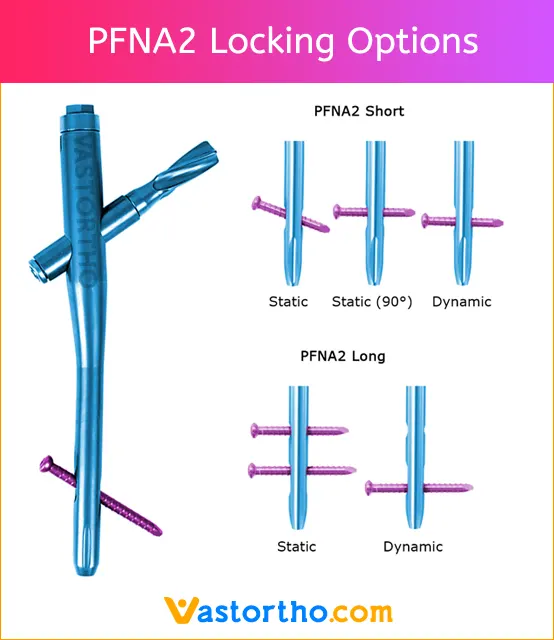
Several distal locking options: Static or dynamic locking can be performed via the aiming arm with PFNA2 small and medium. The PFNA2 long additionally allows for secondary dynamization.

The PFNA2 Nail is available in 4 sizes

  1. Small, length 170 mm
  2. Small, length 200 mm
  3. Medium, length 240 mm
  4. Large, length 260-420 mm

Inserting the PFNA2 blade compacts the cancellous bone providing additional anchoring, which is especially important in osteoporotic bone.

Increased stability caused by bone compaction around the PFNA2 blade has been biomechanically proven to retard rotation and varus collapse. Biomechanical tests have demonstrated that the PFNA2 blade had a significantly higher cut-out resistance in comparison with commonly-used
screw systems.

All surgical steps required to insert the PFNA2 blade are performed through lateral incision. The PFNA2 blade is automatically locked to prevent rotation of the blade and femoral head.
PFNA2 Specification

PFNA2 Nail Uses and Sizes.

PFNA2 Nail Sizes

Length 180 mm
Dia 9mm, 10mm, 11mm and 12mm

Length 200 mm
Dia 9mm, 10mm, 11mm and 12mm

Length 240 mm
Dia 9mm, 10mm, 11mm and 12mm

Length 300 mm to 420 mm
Dia 9mm, 10mm, 12mm and 14mm , Left and Right

PFNA2 Nail Uses

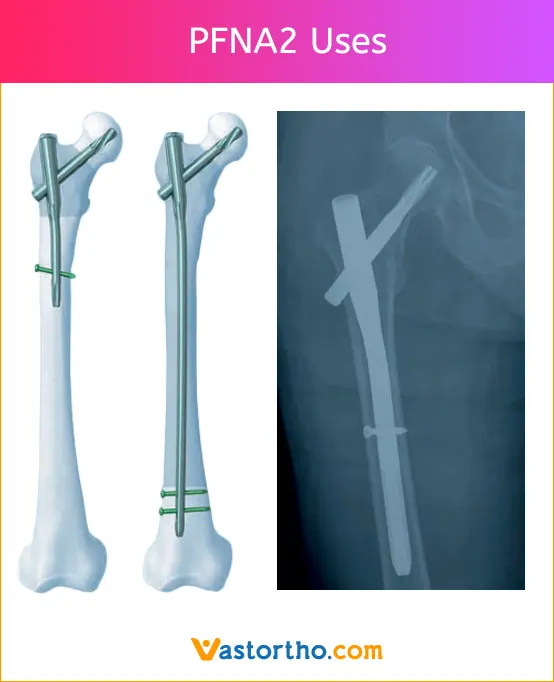
PFNA2 short (Length 170 mm – 240 mm)

Indications

  1. Pertrochanteric fractures
  2. Intertrochanteric fractures
  3. High subtrochanteric fractures

Contraindications

  1. Low subtrochanteric fractures
  2. Femoral shaft fractures
  3. Isolated or combined medial femoral neck fractures

PFNA2 long (Length 260 mm – 420 mm)

Indications

  1. Low and extended subtrochanteric fractures
  2. Ipsilateral trochanteric fractures
  3. Combination fractures (in the proximal femur)
  4. Pathological fractures

Contraindications

  1. Isolated or combined medial femoral neck fractures

PFNA2 Uses

PFNA2 Instruments Set

PFNA2 Instruments Set

PFNA2 Instruments Set contains instruments required for treatment of proximal femoral fractures in geriatric osteoporotic patients using PFNA2 Nails.

PFNA2 Instruments Set Features:

  1. Instruments for PFNA2 Nails.
  2. Instruments are organised in general order of use.
  3. PFNA2 Instruments Set can be modified according to customer requirements and preference also, in this case minimum quantities are required.
  4. Instruments are fitted in Silicon Foam.
  5. Graphics of instruments are made in instruments Box to keep Instruments at their define places.

Below are list of items in PFNA2 Instruments Set.

  • PFNA2 Distal Zig : 1 Qty
  • PFNA2 Proximal Zig : 1 Qty
  • PFNA2 Zig Handle : 1 Qty
  • Solid Hammer : 1 Qty
  • Conical Bolt (Nail Holding Bolt) Tightner : 1 Qty
  • Slotted Hammer : 1 Qty
  • PFNA Blade Introducer : 1 Qty
  • Driving Head : 1 Qty
  • Conical Bolt (Nail Holding Bolt) : 1 Qty
  • Proximal Sleeve Threaded With Nut : 1 Qty
  • Wire Sleeve : 1 Qty
  • Trocar 3 mm : 1 Qty
  • Protection Sleeve : 1 Qty
  • Drill Sleeve : 1 Qty
  • Trocar : 1 Qty
  • Guide Wire 3 mm : 1 Qty
  • Medulary Tube : 1 Qty
  • PFNA2 Blade Extractor : 1 Qty
  • PFNA2 Blade Reamer : 1 Qty
  • Cortex Reamer : 1 Qty
  • Proximal Reamer 15 mm : 1 Qty
  • Ram Rod : 1 Qty
  • Depth Gauge : 1 Qty
  • Screw Driver for 4.9 mm Locking Bolt : 1 Qty
  • Measuring Scale : 1 Qty
  • Quick Coupling Handle : 1 Qty
  • Solapur Sleeve : 1 Qty
  • Wire Sleeve for Solapur Sleeve : 1 Qty
  • Tissue Protector : 1 Qty
  • Wire Introducer : 1 Qty
  • Measuring Gauge : 1 Qty
  • Bending Rod 5 mm : 1 Qty
  • PFNA Blade Key : 1 Qty
  • Bone Awl : 1 Qty
  • Drill Bit 4 mm x 300 mm : 1 Qty
  • Bone Awl Cannulated : 1 Qty
  • Nail Extractor : 1 Qty
  • Graphics Aluminum Box with Silicone Fittings : 1 Qty

Do you have any questions for PFNA2 Nail? Please fill this form we will get in touch with you shortly.

Name(Required)
This field is for validation purposes and should be left unchanged.

Clinical Evaluation of PFNA2 for treatment of intertrochanteric fractures.

Background

The preferred treatment of intertrochanteric fractures in aged patients is controversial. The purpose of the present study was to evaluate the outcomes of the Asian proximal femur intramedullary nail antirotation system (PFNA2) for stabilization of such fractures.

Methods

The PFNA2 was used to treat intertrochanteric fractures in 163 elderly patients from March 2010 to March 2013. The patients comprised 69 men and 94 women with a mean age of 74.7 ± 13.0 years. All fractures were classified by the Orthopaedic Trauma Association classification system; 53, 83, and 27 fractures were classified as 31A1, 31A2, and 31A3, respectively. We statistically evaluated the intraoperative blood loss, operation time, incision length, X-ray exposure time, and postoperative outcomes. Patients were followed up for a mean of 15.2 months (range, 10–24 months). Functional outcomes were assessed according to the Harris hip scoring system.

Results

Statistical analysis revealed an average operation time of 45.7 min (range, 35–110 min), average intraoperative blood loss of 115.2 mL (range, 65–430 mL), X-ray exposure time of 2.7 ± 1.4 s (range, 2–6 s), and total incision length of 6.5 ± 2.2 cm (range, 5.5–13.0 cm). Patients were followed up for a mean of 14.5 months (range, 10–24 months). The neck shaft angle was 134° ±15° (range, 115°–150°), and the fracture healing time was 14.0 ± 2.5 weeks (range, 11–19 weeks). The Harris hip score was 85.6 ± 17.5 points (range, 65–100 points) and included 41 excellent cases (25.15%), 92 good cases (56.44%), 26 moderate cases (15.95%), and 4 poor cases (2.45%) for a positive outcome rate of 81.60%. There were no varus hip deformities, screw cutouts, or femoral shaft fractures. Fourteen patients had thigh pain (9.82%), and five had inner thigh pain (3.07%); seven had more severe pain that was improved by physical therapy.

Conclusion

PFNA2 has the advantages of a simple operation, few complications, and clinical efficacy for the treatment of intertrochanteric fractures. However, evaluation of its long-term efficacy and risk of other complications requires a large-sample, multicenter observational study.

PFNA2 Surgical Techniques

1. Determine entry point

In AP view, the PFNA2 entry point is on the tip or slightly lateral to the tip of the greater trochanter in the curved extension of the medullary cavity, as the ML angle of the PFNA2 is 5°.

In lateral view the entry point is in line with the axis of the intramedullary canal.

PFNA2 Surgical Techniques 1

2. Insert guide wire

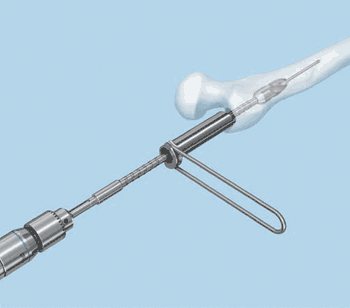
Secure the guide wire in the power tool. Alternatively, the universal chuck with T-handle can be used to insert the guide wire manually.

Position both the protection sleeve and the drill sleeve at the insertion point. Insert the guide wire through the protection sleeve and the drill sleeve. Remove the power tool and the drill sleeve.

To correct the placement of the guide wire, leave the first guide wire in place and insert a second guide wire through one of the multiple holes of the drill sleeve.

PFNA2 Surgical Techniques 2

3. Open femur with flexible drill bit

Guide the flexible cannulated drill bit through the protection sleeve over the guide wire and drill the cavity for the proximal part of the PFNA2 nail with the power tool. Remove the drill bit, the protection sleeve and the guide wire.

Precaution: It is recommended to open the femur by using a power tool at high speed or carefully by hand. To prevent dislocating the fracture fragments, avoid lateral movements or excessive compression forces.

PFNA2 Surgical Techniques 3

4. Option: Ream medullary canal

If necessary, enlarge the femoral canal to the desired diameter using the medullary reamer

Check fracture reduction under image intensifier control.

Insert reaming rod: Insert the reaming rod into the medullary canal to the desired insertion depth. The tip must be correctly positioned
in the medullary canal since it determines the final distal position of the long PFNA2 Nail.

Reaming: Starting with the 8.5 mm diameter reaming head, ream to a diameter of 0.5 to 1.5 mm greater than the nail diameter. Ream in 0.5 mm increments and advance the reamer with steady, moderate pressure. Do not force the reamer. Partially retract the reamer repeatedly to clear debris from the medullary canal.

Use the holding forceps to retain the reaming rod while reaming and to prevent it from rotating. Remove the reaming rod before locking the intramedullary nail.

PFNA2 Surgical Techniques 4

1. Assemble PFNA2 instruments

Guide the connecting screw through the insertion handle and secure the desired PFNA2 Nail to the insertion handle using the hexagonal screwdriver with spherical head.

Precaution: Ensure that the connection between PFNA2 and insertion handle is tight (retighten, if necessary) to avoid deviations when inserting the PFNA2 blade through the aiming arm. Do not attach the aiming arm yet.

PFNA2 Surgical Techniques 5

2. Insert PFNA2

Use image intensifier control to insert the PFNA2 Nail. Carefully insert the PFNA2 manually using slight bidirectional turns of the insertion handle as far as possible into the femoral opening. If the PFNA2 cannot be inserted, select a smaller size PFNA2 Nail diameter or ream the medullary cavity to a diameter that is at least 1 mm larger than that of the selected nail.

The correct PFNA2 insertion depth is reached as soon as the projected PFNA2 blade is positioned in the center of the femoral head. A too cranial or too caudal PFNA2 position should be avoided as it can lead to malposition of the PFNA2 blade.

The anteversion can be determined by inserting a guide wire ventral to the femoral neck in the femoral head. In the mediolateral view, place the insertion handle parallel to the guide wire to align the correct rotation of the PFNA2.

Remove all guide wires.

PFNA2 Surgical Techniques 6

Optional instruments

Attach the connector on the insertion handle and use light hammer blows on the connector to insert the nail.

Remove the connector.

Optionally, instead of the connector, the hammer guide can be threaded into the insertion handle and the hammer can be used as a slide hammer.

Remove the hammer guide.

Precaution: Use only light blows on the connector for insertion handle. Avoid unnecessary use of force to prevent loss of reduction or an iatrogenic fracture.

PFNA2 Surgical Techniques 7

1. Choose aiming arm for PFNA2 blade insertion

Using the hexagonal screwdriver with spherical head, confirm that the connecting screw between the insertion handle and the PFNA2 Nail is sufficiently tightened.

Mount the appropriate aiming arm based on the chosen CCD angle of the PFNA2 and fix it firmly to the insertion handle.

Insert the plug for aiming arm into the locking hole of the nail length that is NOT used in this case.

PFNA2 Surgical Techniques 8

2. Prepare guide wire insertion

Screw the buttress nut on the protection sleeve for PFNA blade. Make sure the «lateral side» marking points towards the head of the sleeve. Screw the buttress nut up to the marking on the protection sleeve.

Insert the drill sleeve and the trocar through the protection sleeve.

Advance the entire sleeve assembly for PFNA blade through the aiming arm to the skin until it clicks into the aiming arm. Adjust the position of the buttress nut if necessary.

Verify nail insertion depth and position for the helical blade/screw. Place a guide wire on the yellow marking of the aiming arm and radiographically check the guide wire position in AP.

PFNA2 Surgical Techniques 9

3. Option: Position guide wire with aiming device

Attach the guide wire aiming device for AP orientation to the aiming arm using the connecting screw for PFNA.

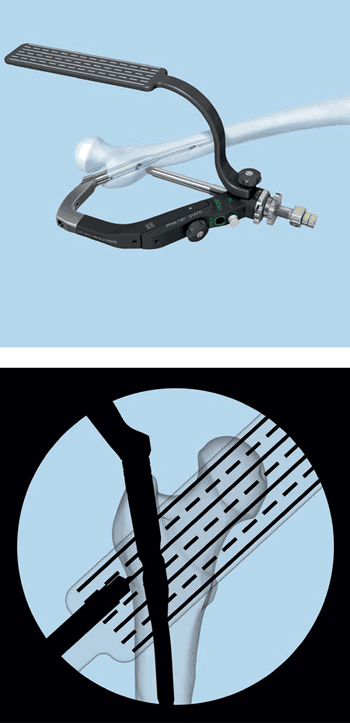
Position the C-arm for the AP view. Rotate the C-Arm until any two orientation lines are symmetric to the protection sleeve.

The midline in between these two orientation lines predicts the location of the guide wire and PFNA2 Blade.

Adapt the insertion depth of the nail until the midline is centered in the femoral head.

The C-arm may be readjusted to make sure that two lines are symmetric to the sleeve.

PFNA2 Surgical Techniques 10

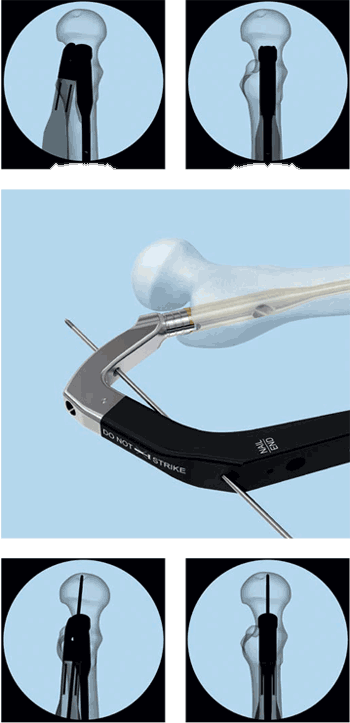
Position the C-arm in the true lateral view (alignment of the axis of the femoral neck congruent with the axis of the femoral shaft).

Adjust nail rotation until the two lines on the insertion handle are symmetric to the PFNA nail.

Note: A 3.2 mm guide wire can be inserted in the corresponding hole in the insertion handle to predict the location of the guide wire and PFNA blade.

PFNA2 Surgical Techniques 11

4. Insert guide wire

Make a stab incision in the area of the trocar tip. Advance the sleeve assembly through the soft tissues in direction of the lateral cortex.

Insert the sleeve assembly as far as the lateral cortex. Advance the protection sleeve to the lateral cortex using slight clockwise turns of the buttress nut. Prepare the passage of the protection sleeve by turning the internal drill sleeve.

Note: The sleeve assembly must be in contact with the bone during the entire blade implantation. Do not tighten the buttress nut too firmly as this could impair the precision of the insertion handle and sleeve assembly.

Mark the femur and remove the trocar. Insert a new guide wire through the drill sleeve into the bone. Verify both direction and position under image intensifier control in both AP and lateral view.

PFNA2 Surgical Techniques 12

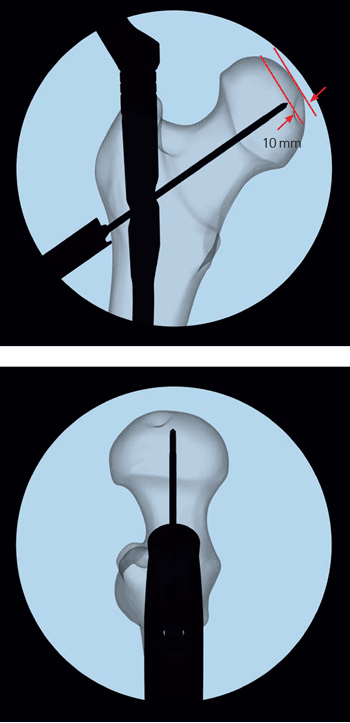
In the AP and lateral view, the optimal position of the guide wire is the exact center of the femoral head. Insert the guide wire subchondrally into the femoral head at a distance of 10 mm below the joint level. Minimal distance to the joint is 5 mm. The tip of the guide wire is positioned at the intended blade tip position.

Note: If the PFNA2 Nail or the guide wire requires repositioning; remove the guide wire, release the sleeve assembly with buttress nut from the aiming arm by pressing the button on the clamp device, and remove it. The PFNA2 can be repositioned only by rotation, deeper insertion or partial retraction. Reinsert the sleeve assembly and turn the buttress nut clockwise to position the assembly on the bone. Introduce a new
guide wire.

Precaution: Insert the guide wire for the PFNA blade carefully to avoid penetration into the joint. Penetration of the articular surface might lead to a contraindication for the augmentation of the PFNA blade.

PFNA2 Surgical Techniques 13

Optional technique for antirotation wires

In very unstable fractures, insert an additional guide wire to prevent rotation. Leave the drill sleeve in place in the protection sleeve when applying this technique.

After having inserted the guide wire into the femoral head, secure the aiming jig for anti-rotation wire either anterior or posterior to the aiming arm. Secure the position of the anti-rotation wire by tightening the hexagonal nut.

Insert the drill sleeve into the aiming jig for anti-rotation wire. Make a stab incision and insert the drill sleeve to the bone.

PFNA2 Surgical Techniques 14

Use image intensifier control to insert a guide wire into the femoral head. If a second anti-rotation wire is necessary, use the same procedure to insert it into the femoral head.

Note: In axial view, the anti-rotation wire will approach, but not touch the blade tip. This anti-rotation wire fixes the femoral head only temporarily and will be removed after the insertion of the blade.

PFNA2 Surgical Techniques 15

5. Measure the PFNA2 blade length

Verify the position of the guide wire in AP and lateral view before measuring the length.

Guide the measuring device over the guide wire. Advance the measuring device to the protection sleeve and determine the length of the required blade. The measuring device indicates the exact length of the guide wire in the bone.

In the AP and lateral view, the correct position of the PFNA2 blade is 10 mm below the joint level. Minimal distance to the joint is 5 mm. If the guide wire’s position is subchondral, subtract 10 mm to measure the PFNA2 blade length correctly.

Remove the measuring device.

Carefully remove the drill sleeve without changing the position of the guide wire.

PFNA2 Surgical Techniques 16

6. Open lateral cortex for PFNA2 blade insertion

Push the cannulated drill bit over the 3.2 mm guide wire. Drill to the stop. This opens the lateral cortex.

Precaution: If the guide wire has been bent slightly during insertion, guide the drill bit over the wire using carefully forward and backward movements. However, if the wire has been bent to a greater extent, reinsert it or replace it by a new guide wire (see step 4). Otherwise, the guide wire may be advanced through the joint.

PFNA2 Surgical Techniques 17

7. Drill hole for PFNA2 blade

Note: Use reamer only in a situation with good bone quality.

Set the chosen blade length on the cannulated reamer by fixing the fixation sleeve in the corresponding position. Read off the correct length on the side of the fixation sleeve pointing towards the tip of the reamer.

Push the reamer over the guide wire. Monitor drilling under image intensifier control. Drill to the stop. The fixation sleeve prevents further drilling.

Precaution: Use the reamer only after opening the lateral cortex. If the guide wire has been bent slightly during insertion, guide the reamer over the wire using carefully forward and backward movements. However, if the wire has been bent to a greater extent, reinsert it or replace it with a new guide wire (see step 4). Otherwise, the guide wire may be advanced through the joint.

PFNA2 Surgical Techniques 18

8. Assemble PFNA2 blade on the impactor

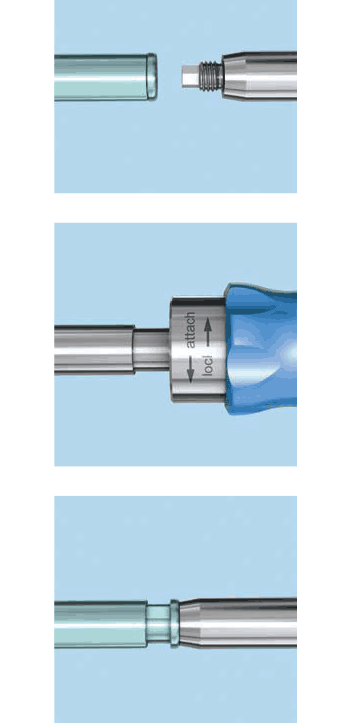
The PFNA2 blade is supplied in a locked state.

While attaching the PFNA2 blade on the impactor, screw the impactor counterclockwise (note the mark “attach” on the impactor) into the end of the PFNA2 blade to unlock the blade. Push the PFNA2 blade gently towards the impactor while attaching the PFNA2 blade. Do not overtighten.

Precaution: The tip of the PFNA2 blade must rotate freely after attaching it to the impactor. This is essential for the implantation of the PFNA2 blade. Otherwise remove and dispose of the blade. Do not over tighten the connection between the impactor and the PFNA2 blade.

PFNA2 Surgical Techniques 19

9. Insert PFNA2 blade

Insert the blade-impactor assembly over the guide wire. Push the button on the protection sleeve, align the blade (note marking on the protection sleeve) and advance the blade impactor assembly further through the protection sleeve.

Manually insert the blade over the guide wire advancing as far as possible into the femoral head.

PFNA2 Surgical Techniques 20

Use monitoring during insertion of the PFNA2 blade.

Insert the PFNA2 blade to the stop by applying gentle blows with the hammer.

Precaution: Inserting the blade to the stop is important, as the impactor must click into the protection sleeve. Do not use unnecessary force when inserting the PFNA2 blade.

PFNA2 Surgical Techniques 21

10. Lock PFNA2 blade

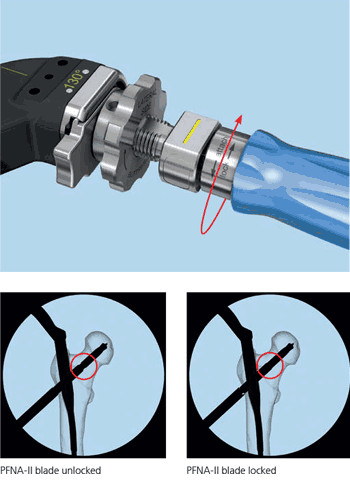
To lock the PFNA2 blade, turn the impactor clockwise (note «lock» marking on the handle) and tighten the blade.

Verify PFNA2 blade locking intraoperatively. The PFNA2 blade is locked if all gaps are closed.

Note: The gliding of the PFNA2 blade is guaranteed. If the PFNA2 blade cannot be locked, remove it and replace it with a new PFNA2 blade (see implant removal, step 1).

PFNA2 Surgical Techniques 22

Press the button on the protection sleeve to remove the impactor. Remove and dispose of the guide wire.

When proximal locking is complete, release and remove the protection sleeve and the buttress nut by pressing the button on the clamp device of the aiming arm in order to continue with distal locking or leave it in place to continue with intraoperative compression.

PFNA2 Surgical Techniques 23

11. Option: Intraoperative compression

Precaution: Do not use intraoperative compression in osteoporotic bone.

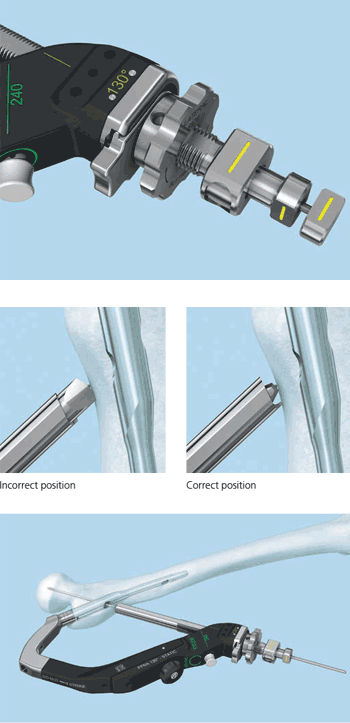
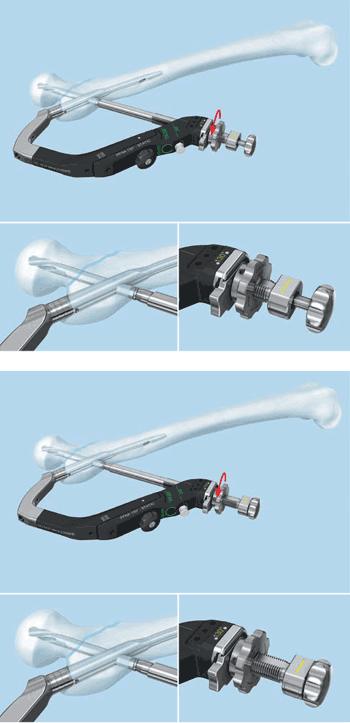
Screw the compression instrument into the blade through the protection sleeve.

Turn the buttress nut counterclockwise to move the protection sleeve backwards until it is pushing towards the compression instrument.

PFNA2 Surgical Techniques 24

Under image intensifier control, further turn the buttress nut counterclockwise to achieve intraoperative compression and
close the fracture gap.

Precautions:
–– The blade must be locked to apply intraoperative compression.
–– Control compression under image intensifier control.
–– Do not use excessive force in order to avoid pulling out the blade from the femoral head.
–– The blade may be slightly overinserted before applying intraoperative compression to prevent it from sticking out laterally.

Release strain by turning the buttress nut clockwise.

Remove the compression instrument. Verify PFNA2 blade locking under image intensifier control. The PFNA2 blade is locked if all gaps are closed. If necessary, relock the blade using the extraction screw.

Release and remove the protection sleeve and the buttress nut by pressing the button on the clamp device of the aiming arm to continue with distal locking.

PFNA2 Surgical Techniques 25

More Products from Interlocking Nails

PFNA2 Nail Contraindications

Contraindications may be qualified or total, and need to be taken into consideration when evaluating the prognosis in each case. The physician’s education, training and professional judgement must be relied upon to choose the most appropriate device and treatment. Conditions presenting an increased risk of failure include:

  • Any active or suspected latent infection or marked local inflammation in or about the affected area.
  • Compromised vascularity that would inhibit adequate blood supply to the fracture or the operative site.
  • Bone stock compromised by disease, infection or prior implantation that can not provide adequate support and/or fixation of the devices.
  • Material sensitivity, documented or suspected.
  • Obesity. An overweight or obese patient can produce loads on the implant that can lead to failure of the fixation of the device or to
    failure of the device itself.
  • Patients having inadequate tissue coverage over the operative site.
  • Implant utilization that would interfere with anatomical structures or physiological performance.
  • Any mental or neuromuscular disorder which would create an unacceptable risk of fixation failure or complications in postoperative care.
  • Other medical or surgical conditions which would preclude the potential benefit of surgery.
  • All associated diseases which could endanger the function and success of the PFNA2 Nail.

Warnings and Precautionary for PFNA2 Nail

Before using PFNA2 Nail, the surgeon and ancillary staff should study the safety information in these instructions, as well as any product-specific information in the product description, surgical procedures and/or brochures.

Nail is made from medical grade materials and are designed, constructed and produced with utmost care. These quality PFNA2 assure best working results provided they are used in the proper manner. Therefore, the following instructions for use and safety recommendations must be observed.

Improper use of  PFNA2 can lead to damage to the tissue, premature wear, destruction of the instruments and injury to the operator, patients or other persons.

It is vital for the operating surgeon to take an active role in the medical management of their patients. The surgeon should thoroughly understand all aspects of the surgical procedure and instruments including their limitations. Care in appropriate selection and proper use of surgical instruments is the responsibility of the surgeon and the surgical team. Adequate surgical training should be completed before use of implants.

Factors which could impair the success of the operation:

  • Allergies to implanted materials.
  • Localized bone tumours.
  • Osteoporosis or osteomalacia.
  • System disease and metabolic disturbances.
  • Alcohol and drug abuse.
  • Physical activities involving excessive shocks, whereby the implant is exposed to blows and/or excessive loading.
  • Patients who are mentally unable to understand and comply with the doctor’s instructions.
  • Poor general health.

Possible Adverse Effects

The following adverse effects are the most common resulting from implantation:

  • Loosening of the Nail, which may result from cyclic loading of the fixation site and/or tissue reaction of the implant.
  • Early and late infection.
  • Further bone fracture resulting from unusual stress or weakened bone substance.
  • Temporary or chronic neural damage resulting from pressure or hematomata.
  • Wound hematomas and delayed wound healing.
  • Vascular disease including venal thrombosis, pulmonary embolism and cardiac arrest.
  • Heterotopic ossification.
  • Pain and discomfort due to presence of the PFNA2 Nail.
  • Mechanical failure of the implant, including bending, loosening or breakage.
  • Migration of implant resulting in injury.

Preoperative Planning for PFNA2 Nail

The operating planning is carried out following a thorough clinical evaluation of the patient, Also, x-rays must be taken to allow a clear indication of the bony anatomy and associated deformities. At the time of the operation, the corresponding implantation instruments in addition to a complete size of PFNA2 Nail must be available.

The clinician should discuss with the patient the possible risks and complications associated with the use of implants. It is important to determine pre-operatively whether the patient is allergic to any of the implant materials. Also, the patient needs to be informed that the performance of the device cannot be guaranteed as complications can affect the life expectancy of the device.

PFNA2 Nail Precautions

  • Confirm functionality of instruments and check for wear during reprocessing. Replace worn or damaged instruments prior to use.
  • It is recommended to use the instruments identified for this PFNA2 Nail.
  • Handle devices with care and dispose worn bone cutting instruments in a sharps container.
  • Always irrigate and apply suction for removal of debris potentially generated during implantation or removal.

PFNA2 Nail Warnings

  • PFNA2 Nail can break during use (when subjected to excessive forces). While the surgeon must make the final decision on removal of the broken part based on associated risk in doing so, we recommend that whenever possible and practical for the individual patient, the broken part should be removed. Be aware that implants are not as strong as native bone. Implants subjected to substantial loads may fail.
  • Instruments, screws and cut plates may have sharp edges or moving joints that may pinch or tear user’s glove or skin.
  • Take care to remove all fragments that are not fixated during the surgery.
  • While the surgeon must make the final decision on implant removal, we recommend that whenever possible and practical for the individual patient, fixation devices should be removed once their service as an aid to healing is accomplished. Nail removal should be followed by adequate post-operative management to avoid refracture.

PFNA2 Nail General Adverse Events

As with all major surgical procedures, risks, side effects and adverse events can occur. While many possible reactions may occur, some of the most common include: Problems resulting from anesthesia and patient positioning (e.g. nausea, vomiting, dental injuries, neurological impairments, etc.), thrombosis, embolism, infection, nerve and/or tooth root damage or injury of other critical structures including blood vessels, excessive bleeding, damage to soft tissues incl. swelling, abnormal scar formation, functional impairment of the musculoskeletal system, pain, discomfort or abnormal sensation due to the presence of the device, allergy or hypersensitivity reactions, side effects associated with hardware prominence, loosening, bending, or breakage of the device, mal-union, non-union or delayed union which may lead to breakage of the PFNA2 Nail, reoperation.

What is a femoral shaft fracture?

A femoral shaft fracture is a break of the femur (thighbone). Femoral nailing is an operation to fix a broken femur using a metal rod. The metal rod is called a femoral nail (also called an intramedullary or interlocking nail)

Your surgeon has recommended femoral nailing to treat your broken femur. However, it is your decision to go ahead with the operation or not. This document will give you information about the benefits and risks to help you make an informed decision. If you have any questions that this
document does not answer, you should ask your surgeon or any member of the healthcare team.

How does a femoral shaft fracture happen?

Road accidents and sport are the cause of most femoral shaft fractures. You can lose up to a litre (about two pints) of blood into the thigh muscle at the time of the injury. Sometimes the injury causes the bone to break through the skin. This is known as an open or compound fracture.

What are the benefits of surgery?

The main benefits of surgery are that you will only need a short stay in hospital and you will be able to use your leg sooner. Surgery will also make sure your bone heals in a good position.

Are there any alternatives to femoral nailing?

A femoral shaft fracture can be treated in traction (using a heavy weight fixed to the leg to pull the bones into position until they heal). However, some fractures are difficult to hold in a good position without surgery. If you have an open fracture, you will almost certainly need an operation. Your surgeon can sometimes fix your femoral shaft fracture with an external fixator or a plate and screws instead of a femoral nail. They will explain why they recommend femoral nailing for your fracture.

What will happen if I decide not to have the operation?

You will have your leg in traction. You may need to stay in hospital for a long time. This can lead to complications such as blood clots, chest infection and pressure sores. After a number of weeks, your leg may be put into a large plaster cast (called a hip spica) or a brace. The fracture will take about three to six months to heal. You will need physiotherapy to learn to walk again because your muscles will have become weak after spending such a long time in bed.

What does the operation involve?

The healthcare team will carry out a number of checks to make sure you have the operation you came in for and on the correct side. You can help by confirming to your surgeon and the healthcare team your PFNA2 Nail and the operation you are having.

A variety of anaesthetic techniques is possible. Your anaesthetist will discuss the options with you and recommend the best form of anaesthesia for you. You may also have injections of local anaesthetic to help with the pain after surgery. You may be given antibiotics during the operation to reduce the risk of infection. The operation usually takes between an hour and an hour and a half.

Your surgeon will push the femoral nail down the inside of the bone, either through a cut on the side of the hip or on the front of the knee. The nail goes across the break and holds it in position. The nail is held in the bone by locking screws that pass through holes in the nail. If you have an open fracture, your surgeon will clean the skin wound thoroughly during the operation to reduce the risk of infection. If the skin is badly damaged, you may also need one or more plastic surgery operations. At the end of the operation, your surgeon will close the skin with stitches or clips.

What should I do about my medication?

You should let your doctor know about all the medication you are on and follow their advice. This includes herbal remedies and medication to control diabetes and blood pressure. If you are on beta-blockers, you should continue to take them as normal. You may need to stop taking warfarin or clopidogrel before your operation. Anti-inflammatory painkillers may stop the fracture healing properly, so it is better not to
take these if possible.

What can I do to help make the operation a success?

If you smoke, stopping smoking may reduce your chances of getting complications and will improve your long-term health. Nicotine is known to stop fractures from healing. Regular exercise should help you recover and improve your long-term health. Before you start exercising, ask a member of the healthcare team or your GP for advice. You can reduce your risk of infection in a surgical wound by keeping warm around the time of your operation. Let a member of the healthcare team know if you are cold.